
Their Finest Hour: An Introduction to the Battle of Britain
Imagine a summer sky, not filled with the gentle buzz of bees or the laughter of holidaymakers, but with the deadly dance of fighter planes, the roar of engines, and the sinister drone of bombers. This was the reality for the people of Britain in the summer and autumn of 1940. The Battle of Britain was not just a series of aerial engagements; it was a pivotal moment in World War II, a desperate struggle for survival that would determine the fate of a nation and, arguably, the course of the entire war.
Winston Churchill, in one of his most iconic speeches, declared, “Let us therefore brace ourselves to our duties, and so bear ourselves that, if the British Empire and its Commonwealth last for a thousand years, men will still say, ‘This was their finest hour.'” He was referring to the impending battle, a battle that would pit the outnumbered Royal Air Force (RAF) against the might of Hitler’s Luftwaffe. It was a conflict fought in the skies over southern England, a campaign that saw incredible bravery, technological innovation, and a nation united against a seemingly unstoppable foe. Let’s delve into the story of this legendary battle, explore its profound impact, and discover how its memory is kept alive today, particularly at places like the Kent Battle of Britain Museum.
The Gathering Storm: Prelude to Conflict
The spring and early summer of 1940 had been disastrous for the Allies. Hitler’s Blitzkrieg had swept across Western Europe with terrifying speed. Denmark and Norway fell, followed by the Netherlands, Belgium, and Luxembourg. Then, in a stunning blow, France, a major military power, capitulated in June. The British Expeditionary Force (BEF) had been miraculously evacuated from the beaches of Dunkirk, but they left behind vast quantities of equipment, and Britain now stood alone, facing a triumphant Germany across the narrow English Channel.
Adolf Hitler was convinced that Britain, isolated and seemingly defeated, would sue for peace. He even issued a “last appeal to reason” to Britain. But Britain, under the defiant leadership of Churchill, refused to yield. This left Hitler with a strategic dilemma. To invade Britain – an operation codenamed ‘Operation Sea Lion’ – he first needed to achieve air superiority. Without control of the skies, the Royal Navy would decimate any invasion fleet, and the RAF would wreak havoc on his landing forces. Thus, the Luftwaffe was tasked with a clear objective: destroy the Royal Air Force, its airfields, its aircraft factories, and its command and control systems. Only then could an invasion be contemplated. The stage was set for a monumental aerial confrontation.
The Opposing Forces: RAF vs. Luftwaffe – A David and Goliath Scenario?
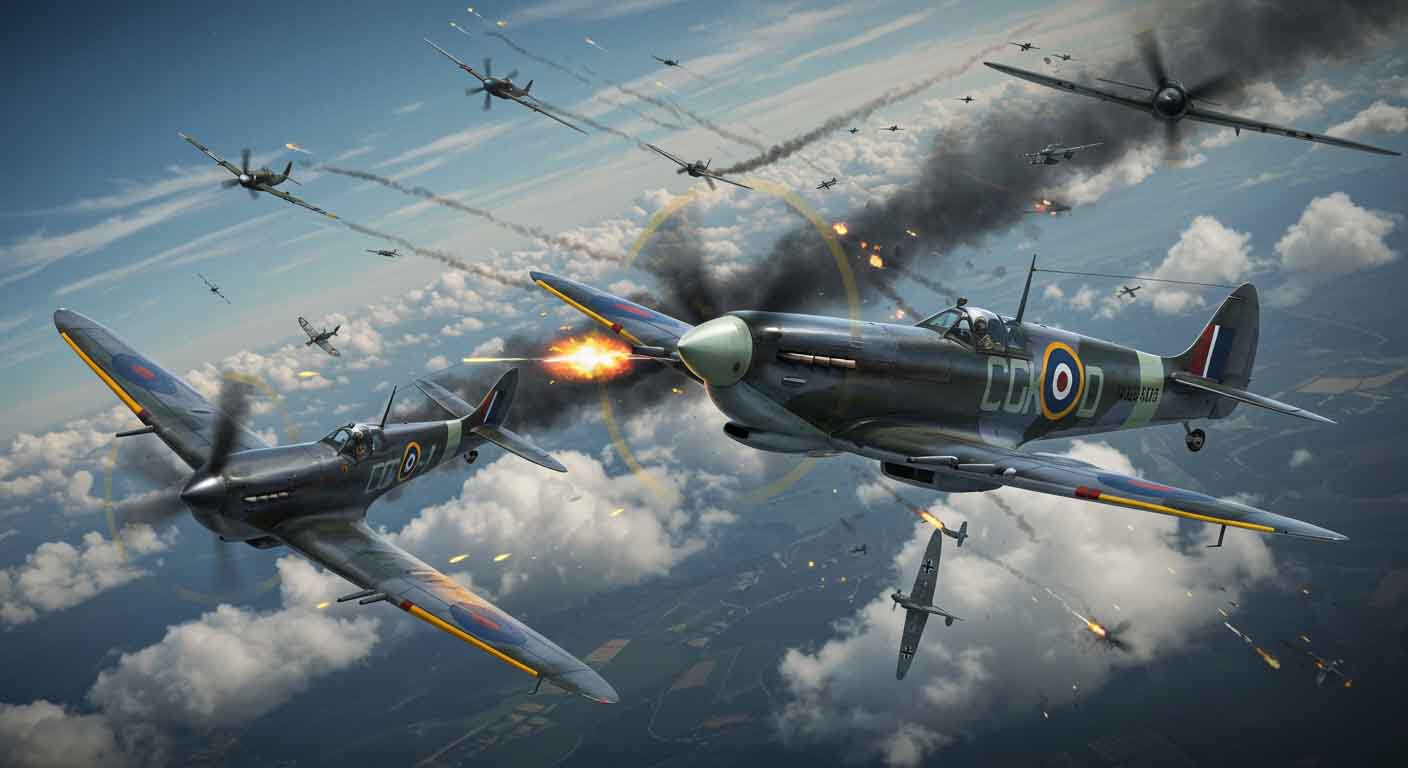
On paper, the Luftwaffe, commanded by Hermann Göring, appeared to have a significant advantage. It was larger, more experienced, and battle-hardened from its campaigns in Poland, Scandinavia, and France. It possessed a formidable array of aircraft, including the Messerschmitt Bf 109E fighter, a fast and agile opponent, the versatile Messerschmitt Bf 110 twin-engine heavy fighter (though it proved vulnerable to single-engine fighters), and a range of bombers like the Heinkel He 111, Dornier Do 17, and the infamous Junkers Ju 87 ‘Stuka’ dive bomber. German pilots were confident, well-trained, and imbued with a sense of invincibility after their recent successes.
Against this, the RAF’s Fighter Command, under Air Chief Marshal Sir Hugh Dowding, seemed outmatched. While the total number of German aircraft available for the battle was greater, the crucial factor was the number of serviceable single-engine fighters. Here, the gap was closer than raw numbers might suggest, especially when considering aircraft stationed within range of southern England. The RAF had two superb fighter aircraft: the Supermarine Spitfire and the Hawker Hurricane. The Spitfire, with its sleek elliptical wings and powerful Rolls-Royce Merlin engine, was a thoroughbred, generally considered a match for, if not superior to, the Bf 109 at higher altitudes. The Hurricane, while slightly slower and less glamorous, was a rugged and stable gun platform, responsible for shooting down more enemy aircraft during the Battle of Britain than all other defences combined. It was also easier to produce and repair than the Spitfire.
Crucially, Britain possessed several hidden advantages. Firstly, it was fighting over home territory. This meant pilots who bailed out could often be rescued and returned to their squadrons quickly, whereas German aircrew shot down over Britain became prisoners of war. British aircraft could also stay in the air longer over the combat zones, as their airfields were close by, while German fighters operating from bases in France and Belgium had limited fuel and thus limited time over England.
Secondly, Britain had a highly sophisticated air defence network, the ‘Dowding System’. This integrated system linked radar stations (Chain Home and Chain Home Low), the Observer Corps, fighter control rooms, and anti-aircraft batteries. Radar gave early warning of incoming raids, allowing Fighter Command to scramble its squadrons to intercept the enemy in the right place and at the right time, conserving precious aircraft and pilots. This was a technological and operational advantage the Germans underestimated.
Thirdly, aircraft production in Britain, under the dynamic leadership of Lord Beaverbrook as Minister of Aircraft Production, was ramped up significantly. Factories worked around the clock, and innovative repair schemes meant damaged aircraft were often quickly returned to service.
Finally, while often outnumbered in specific engagements, the quality and determination of RAF pilots were exceptional. These were not just British pilots; Fighter Command was a truly international force, with significant contributions from pilots from Poland, Czechoslovakia, Canada, Australia, New Zealand, South Africa, Belgium, France, Ireland, and the United States, all united in their determination to defend Britain.
The Battle Commences: Four Gruelling Phases
The Battle of Britain is generally considered to have lasted from early July to the end of October 1940 and can be broadly divided into four phases:
Phase 1: Kanalkampf (Channel Battles) – July to early August 1940 The initial phase saw the Luftwaffe focus its attacks on shipping in the English Channel, coastal towns, and ports. The aim was to draw RAF fighters into battle, wear them down, and clear the Channel for a potential invasion. These engagements were often large and fierce, testing the tactics and resolve of both sides. The RAF learned valuable lessons during this period, and while losses were incurred, Fighter Command was not crippled. The Stuka dive bombers, so effective in earlier campaigns where air superiority was assured, proved highly vulnerable to RAF fighters and suffered heavy losses, leading to their virtual withdrawal from the main battle later on.
Phase 2: Adlerangriff (Eagle Attack) – Mid-August to early September 1940 On August 13th, ‘Adlertag’ (Eagle Day) marked the beginning of the Luftwaffe’s main offensive against the RAF itself. The primary targets were RAF airfields, particularly the sector stations in 11 Group (covering South-East England and London, commanded by Air Vice-Marshal Keith Park), radar installations, and aircraft factories. This was the most critical phase of the battle. If the Luftwaffe had succeeded in destroying these vital targets and grounding Fighter Command, the path to invasion would have been open.
The fighting was intense and relentless. Airfields like Biggin Hill, Kenley, Hornchurch, and Manston came under repeated attack. Ground crews worked tirelessly to repair damaged runways and infrastructure, often under fire. Pilots flew multiple sorties a day, pushing themselves and their machines to the limit. August 18th, known as “The Hardest Day,” saw some of the heaviest fighting, with both sides suffering significant losses. The Luftwaffe launched massive raids, but the RAF, though stretched, fought back with ferocious determination. Despite the damage inflicted, Fighter Command remained operational. The Germans underestimated the resilience of the RAF and the effectiveness of the Dowding System. Attacks on radar stations were not pressed home with sufficient vigour, and the sector stations, though damaged, continued to function.
Phase 3: The Blitz Begins – The Shift to Bombing British Cities – From 7th September 1940 A pivotal moment occurred in late August. After a German bomber crew, allegedly off-course, dropped bombs on London, Churchill ordered a retaliatory raid on Berlin. Though militarily insignificant, the bombing of the German capital infuriated Hitler. On September 7th, in a crucial strategic error, Göring, believing Fighter Command to be on its last legs, ordered a change in tactics. The Luftwaffe switched its main effort from attacking RAF airfields to large-scale daylight bombing raids on London and other major cities. This was the beginning of ‘The Blitz’.
While the bombing of cities caused immense suffering and destruction for the civilian population, it inadvertently gave Fighter Command a vital breathing space. The pressure on its airfields and sector stations eased, allowing them to repair damage and rest weary pilots and ground crews. Attacking London also meant German bombers had to fly further, often with fighter escorts that had less fuel to remain over the target area, making them more vulnerable to interception.
Phase 4: Daylight Raids Decline, Night Raids Continue – Late September to October 1940 The climax of the daylight battle came on September 15th, now commemorated as Battle of Britain Day. The Luftwaffe launched two massive raids on London, hoping to deliver a knockout blow. Fighter Command, using all its available resources, met them in force. The ensuing air battles were some of the largest and most intense of the campaign. Though the RAF claimed to have shot down a vastly inflated number of enemy aircraft (a common issue with combat claims on both sides), the actual German losses were severe enough – around 60 aircraft – to convince the German High Command that air superiority had not been achieved and was unlikely to be.
After September 15th, large-scale daylight raids by German bombers became less frequent, though fighter-bomber attacks continued. The Luftwaffe increasingly switched to night bombing of cities, which continued for months, but the immediate threat of invasion had receded. By the end of October, it was clear that the Luftwaffe had failed in its primary objective of destroying RAF Fighter Command. Operation Sea Lion was postponed indefinitely and, in reality, abandoned.
“Never in the field of human conflict…”: The Few and Their Allies
The pilots of Fighter Command, immortalised by Churchill as “The Few,” bore the brunt of the fighting. They were young men, many still in their late teens or early twenties, from all walks of life. The strain they endured was immense – physical exhaustion, constant fear, and the grief of losing comrades. Yet, day after day, they climbed into their cockpits to face the enemy.
It’s vital to remember the international contribution. Nearly 3,000 aircrew served with Fighter Command during the Battle, and around one-fifth of them were from overseas. The Polish 303 Squadron, for example, became the highest-scoring squadron in Fighter Command during the battle, despite only becoming operational in late August. Czech, Canadian, New Zealand, Australian, South African, Belgian, French, and American pilots all played a significant part. Their skill, courage, and sacrifice were integral to the RAF’s success. The ground crews too were unsung heroes, working tirelessly to keep the aircraft flying, often in perilous conditions.
Why Britain Held On: Key Factors in the RAF’s Victory
Several interconnected factors contributed to the RAF’s victory:
- The Dowding System: The integrated air defence system, particularly radar, provided crucial early warning and allowed for efficient use of limited fighter resources.
- Home Advantage: Fighting over their own territory gave the RAF significant logistical and morale advantages.
- Aircraft Quality: The Spitfire and Hurricane were exceptional aircraft, capable of meeting the Luftwaffe’s best on more than equal terms, especially when flown by skilled pilots.
- German Strategic Errors: The Luftwaffe made several critical mistakes. Underestimating the RAF’s strength and resilience, failing to press home attacks on radar stations, and, most importantly, shifting the focus from RAF airfields to bombing London at a critical juncture, all played into British hands. Göring’s leadership was also often erratic and his understanding of air strategy flawed.
- Leadership and Strategy: Air Chief Marshal Dowding’s cautious and well-managed strategy of husbanding his forces, and Air Vice-Marshal Keith Park’s brilliant tactical command of 11 Group, were instrumental. There was also the more aggressive “Big Wing” theory advocated by Air Vice-Marshal Trafford Leigh-Mallory of 12 Group, which, while controversial and not always suited to the rapid interception needs of 11 Group, did contribute in some of the larger engagements.
- Aircraft Production and Repair: Britain’s ability to produce new aircraft and rapidly repair damaged ones, spearheaded by Lord Beaverbrook, ensured that Fighter Command could replace its losses to a greater extent than the Germans anticipated.
- The “Indomitable British Spirit”: The resilience and determination of the British people, both civilian and military, played an undeniable role.
The Aftermath and Impact on World War II
The Battle of Britain was a turning point in World War II. Its consequences were far-reaching:
- Operation Sea Lion Abandoned: The primary and most immediate impact was the indefinite postponement and effective cancellation of Hitler’s planned invasion of Britain. This was Germany’s first major defeat of the war.
- Britain Remained a Base: Britain’s survival ensured that it remained an unsinkable aircraft carrier and a vital base for future Allied operations, including the D-Day landings in 1944. Without Britain, the liberation of Western Europe would have been infinitely more difficult, if not impossible.
- Morale Boost for the Allies: At a time when Nazi Germany seemed unstoppable, the Battle of Britain provided a much-needed morale boost for the Allies and for occupied countries across Europe. It showed that Hitler’s war machine could be resisted and defeated.
- Shift in German Strategy: Unable to achieve air superiority over Britain, Hitler turned his attention eastward, eventually launching Operation Barbarossa, the invasion of the Soviet Union, in June 1941. This opened up a vast new front and ultimately contributed to Germany’s downfall.
- Demonstration of Air Power: The battle underscored the critical importance of air power in modern warfare, a lesson that would shape military strategy for the rest of the war and beyond.
Remembering the Sacrifice: The Kent Battle of Britain Museum
The sacrifices made during the Battle of Britain are not forgotten, and places like the Kent Battle of Britain Museum play a vital role in preserving this memory for future generations. Located in Hawkinge, near Folkestone in Kent – an area that was very much in the thick of the fighting and known as “Hellfire Corner” – the museum is situated on the site of former RAF Hawkinge, the closest Royal Air Force station to enemy-occupied France.
The Kent Battle of Britain Museum is the oldest established and largest collection of Battle of Britain artefacts on show in the country. It is a privately run museum, a labour of love by enthusiasts and volunteers, and is administered as a charitable trust. What makes this museum particularly special is its focus on personal stories and the sheer volume of authentic relics, many recovered from crash sites. Visitors can see an astonishing array of items, including wreckage from over 700 aircraft (both RAF and Luftwaffe), uniforms, flying equipment, personal belongings of pilots, documents, and photographs.
The museum houses complete or substantial sections of iconic aircraft such as the Hawker Hurricane, Supermarine Spitfire, and Messerschmitt Bf 109. It also features larger exhibits like a Heinkel He 111 and a Junkers Ju 52. The displays are designed to be evocative and educational, giving a real sense of the conditions faced by the aircrew and the intensity of the conflict. You can explore hangars filled with these historical treasures, including the Lord Dowding Memorial Hangar. The museum also has outdoor exhibits, including replica Hurricanes acting as gate guardians and memorials to “The Few.”
For anyone interested in the Battle of Britain or World War II history, a visit to the Kent Battle of Britain Museum offers a deeply moving and informative experience. It provides a tangible connection to the past and serves as a powerful tribute to the men and women who defended Britain in its darkest hour. You can find more information about visiting, including opening times and admission prices, on their official website: https://www.kbobm.org/. It’s worth noting they have specific policies regarding photography to respect the families of those who donated items, so it’s always good to check their website for the latest visitor information before you go.
An Enduring Legacy
The Battle of Britain was more than just a military victory; it was a triumph of courage, resilience, and ingenuity against overwhelming odds. It demonstrated that a determined nation, united in purpose, could withstand the might of a seemingly invincible aggressor. The echoes of those summer skies of 1940 still resonate today, reminding us of the debt owed to “The Few” and all those who contributed to this critical victory. Their sacrifice ensured that the light of freedom was not extinguished in Europe, and their story continues to inspire generations. The battle was, indeed, their finest hour, and its legacy is one that Britain, and the world, should never forget.